Introduction
This documentation provides a detailed explanation of how to integrate with Beans iD Whitelabel API - Native. It includes the steps you will go through for integration and provides reference points to the different API endpoints that you will utilise. Our native implementation allows for a user to verify as a member of any of our supported consumer groups utilising your own native UI. You will interact with our various endpoints validate the information you collect from an individual enabling you to verify them as a member of a consumer group using your own UI backed up by our verification technology.How does it work?
The intended flow is as follows:Authenticate with the Pion API
To conduct a verification, several requests must be made to the Pion API.The Pion API provides an OAuth Client Credentials grant flow which returns an access token. Client credentials can be self-served in the Pion Portal. This will create a new pairing of a
clientId and clientSecret that is used to fetch an access token that must be passed into requests that require authentication.Once you’ve got client credentials, you can send a request to the /auth/token endpoint. See the full API documentation here.Send a request to the Pion API to start a verification
To begin the verification process a request is sent to the Create Verification endpoint in the Pion API. See the full API documentation here.This will begin the verification process for your chosen consumer group, and will create a unique verification ID used to reference this verification going forwards.
Trigger a Phone Number OTP
Gather the user’s phone number and use it to trigger the sending of a one-time passcode (OTP) to the user’s phone number. This can be done using the Trigger Phone OTP endpoint. See the full API documentation here.
Collect and Validate the Phone Number OTP
Collect the 6-digit code from the user to validate the phone identity. This is done by sending the code to the Verify Phone OTP endpoint. See the full API documentation here.
Search for an Institution
Let the user search for their institution using the search endpoint. See the full API documentation here.The institution the user selects will dictate the verification methods available to that user.Student VerificationsFor student verifications, we recommend implementing a live search using a combination of institution name and institution territory.Non-student VerificationsFor non-student verifications, we recommend searching via consumer group and allowing the user to select from the list of returned options. In certain territories for certain consumer groups only one institution may be returned in which case we recommend setting this automatically.
Set the Institution on the Verification
Update the ongoing verification session with the specific
institutionId that was chosen or auto-selected for the user in the previous step.This is done by passing the institutionId into the Set Institution endpoint. See the full API documentation here. Verify your user
Once an institution has been set on a verification we can determine the verification methods available for the selected institution. The
availableMethods array found in the response returned when setting the institution provides this information.- Portal Method
- Email Method
- Manual Method
If
portal is present in the available methods array, follow these steps:- Trigger Portal Attempt: Initialize the portal attempt using the Create Portal Attempt endpoint.
A registered redirect URL must be supplied and this URL must be registered against your application in Pion Portal.
- Open the institution portal: Send the user directly to the
portalStartUrlstring returned in the response payload. - Handle the redirect: The user will complete their login via their institution portal and will be redirected automatically back to the redirect URL you supplied when initialising the attempt.
Verification Status
Each verification has astatus. The status is a top-level indicator that can be used to discern the current state of a verification.
When you encounter a user that already has a verificationId the status can be used to understand how to handle this user.
Pending
If the
status is pending then you should consult the stage to understand where in the verification journey a user currently is.Success
If the
status is success then the verification was successful and the user has been successfully verified as a member of the given consumer group.You should ensure you have provisioned a verified status to your user and that they are able to access any features or perksExpired
If the
status is expired then the verification was previously successful but the user’s verification has since expired.We will dispatch a webhook event to you in the event a verification expires. You can choose to handle the expiry event as you see fit.Failed
If the
status is failed then the user did not verify in time or hit verification limits.You are welcome to create another verification for this user and let them try again, or you can decide to limit the number of verifications a user can attempt.Verification Stages
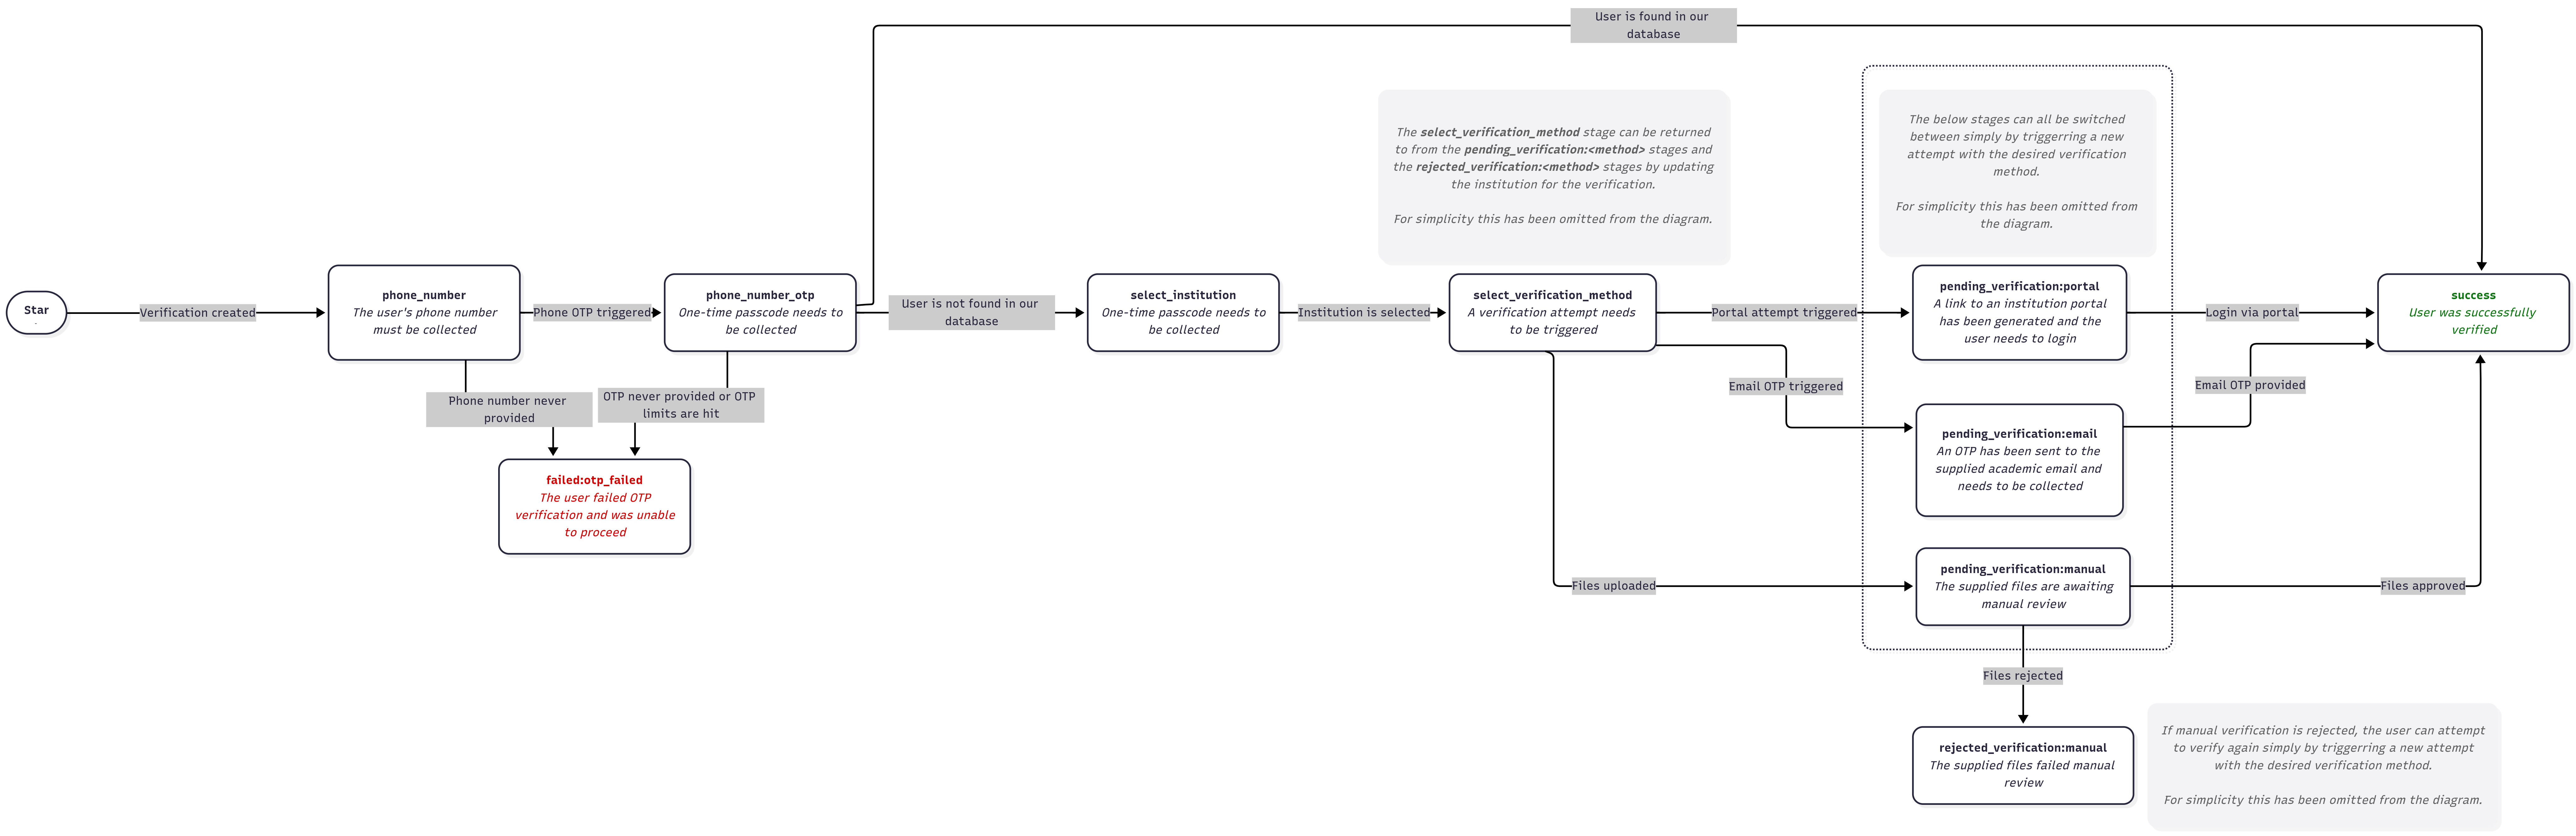
Alongside astatus each verification also has a stage.
The stage is a more granular indicator of the specific step of the verification flow that a verification currently occupies. The below diagram lays out the different stages a verification can go through and the actions that need to be taken for a verification to move from stage to stage.